本文详细分析了Maven的全局/用户级配置文件settings.xml和项目级配置文件pom.xml,便于查阅。
TABLE OF CONTENTS 一、工作原理 二、仓库管理 三、Maven配置文件 四、Settings配置详解 1、localRepository 2、interactiveMode 3、offline 4、pluginGroups 5、servers 6、proxies 7、mirrors 8、profiles repositories properties id pluginRepositories activation 9、activeProfiles 10、Settings.xml配置文件中mirrors和profile中repositories的关系 五、pom.xml配置详解 1、dependencies 2、dependencyManagement 3、properties 4、resources 5、profile 6、modules 7、查找并添加依赖 8、依赖范围管理 9、解决依赖冲突 六、参考资料 一、工作原理 项目根据Maven配置,通常先从本地仓库去拉取jar包,如果没有则取远程仓库拉取,这个远程仓库可以是私服,也可以是中央仓库或者镜像仓库。
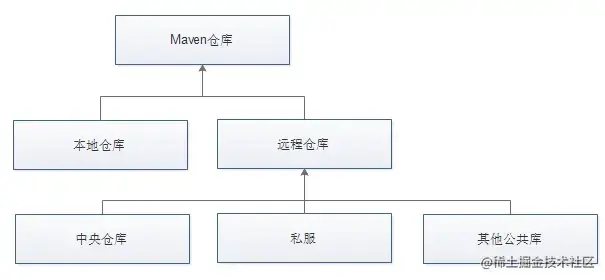
二、仓库管理 Maven分为本地仓库和远程仓库,本地仓库即<localRepository>标签配置的路径。
Maven仓库的关系:
由于墙的存在,国内访问国外中央仓库不顺利,Maven拉取Jar包时会很慢甚至无法拉取,因此需要配置下国内的中央镜像仓库。镜像仓库在Maven配置文件settings.xml下进行配置。
镜像仓库 :将国外的中心仓库复制一份到国内,提升访问速度。
私服 :基于系统保密性的原因,搭建的内部远程仓库,存储一些公司内部不希望被公开的依赖服务,也可以避免因外部中央仓库网络的访问不顺畅导致的各种问题。
三、Maven配置文件 Maven配置文件有三种:
全局配置文件:%MAVEN_HOME%\conf\settings.xml
用户配置文件:C:\Users\用户名\.m2\settings.xml
项目配置文件:项目下的pom.xml
配置优先级:项目pom.xml > 本地settings > 全局settings,如果配置文件同时存在,会进行合并,有重复的配置时,优先级高的配置会覆盖优先级低的配置。
四、Settings配置详解 首先,可以从Maven安装目录的conf下查看配置文件settings.xml,示例如下(注意仅展示结构,要经过定制才可使用):
1
2
3
4
5
6
7
8
9
10
11
12
13
14
15
16
17
18
19
20
21
22
23
24
25
26
27
28
29
30
31
32
33
34
35
36
37
38
39
40
41
42
43
44
45
46
47
48
49
50
51
52
53
54
55
56
57
58
59
60
61
62
63
64
65
66
67
68
69
70
71
72
73
74
75
76
77
78
79
80
81
82
83
84
85
86
<?xml version="1.0" encoding="UTF-8" ?> <settings xmlns ="http://maven.apache.org/SETTINGS/1.2.0" xmlns:xsi ="http://www.w3.org/2001/XMLSchema-instance" xsi:schemaLocation ="http://maven.apache.org/SETTINGS/1.2.0 https://maven.apache.org/xsd/settings-1.2.0.xsd" > <localRepository > /path/to/local/repo</localRepository > <interactiveMode > true</interactiveMode > <offline > false</offline > <pluginGroups > <pluginGroup > com.your.plugins</pluginGroup > </pluginGroups > <servers > <server > <id > deploymentRepo</id > <username > repouser</username > <password > repopwd</password > </server > <server > <id > siteServer</id > <privateKey > /path/to/private/key</privateKey > <passphrase > optional; leave empty if not used.</passphrase > </server > </servers > <proxies > <proxy > <id > optional</id > <active > true</active > <protocol > http</protocol > <username > proxyuser</username > <password > proxypass</password > <host > proxy.host.net</host > <port > 80</port > <nonProxyHosts > local.net|some.host.com</nonProxyHosts > </proxy > </proxies > <mirrors > <mirror > <id > maven-default-http-blocker</id > <mirrorOf > external:http:*</mirrorOf > <name > Pseudo repository to mirror external repositories initially using HTTP.</name > <url > http://0.0.0.0/</url > <blocked > true</blocked > </mirror > </mirrors > <profiles > <profile > <id > jdk-1.4</id > <activation > <jdk > 1.4</jdk > </activation > <repositories > <repository > <id > jdk14</id > <name > Repository for JDK 1.4 builds</name > <url > http://www.myhost.com/maven/jdk14</url > <layout > default</layout > <snapshotPolicy > always</snapshotPolicy > </repository > </repositories > </profile > <profile > <id > env-dev</id > <activation > <property > <name > target-env</name > <value > dev</value > </property > </activation > <properties > <tomcatPath > /path/to/tomcat/instance</tomcatPath > </properties > </profile > </profiles > <activeProfiles > <activeProfile > alwaysActiveProfile</activeProfile > <activeProfile > anotherAlwaysActiveProfile</activeProfile > </activeProfiles > </settings >
1、localRepository 配置本地仓库位置,默认位置为${user.home}/.m2/repository,可以配置为
1 <localRepository > D:\Workslace\Maven\maven-repository</localRepository >
2、interactiveMode Maven是否需要和用户交互以获得输入,默认为true
3、offline 用来标识是否以离线模式运营Maven。当系统不能联网时,可以通过该配置来离线运行。
4、pluginGroups pluginGroups当插件的组织id(groupId)没有显示提供时,供搜寻插件组织Id的列表。
5、servers 访问私服时,某些私服需要配置认证信息,在这里填写。之所以servers配置不写在pom.xml,是因为pom.xml会随着代码上传代码仓库,而settings.xml存储在本地,相对安全。因此,通常在settings.xml中配置servers
1 2 3 4 5 6 7 8 9 10 11 12 13 14 15 16 17 18 <servers > <server > <id > server001</id > <username > my_login</username > <password > my_password</password > <privateKey > ${usr.home}/.ssh/id_dsa</privateKey > <passphrase > some_passphrase</passphrase > <filePermissions > 664</filePermissions > <directoryPermissions > 775</directoryPermissions > </server > </servers >
6、proxies 用来配置代理。
1 2 3 4 5 6 7 8 9 10 11 12 13 14 15 16 17 18 19 20 21 22 <proxies > <proxy > <id > myproxy</id > <active > true</active > <protocol > http</protocol > <host > proxy.somewhere.com</host > <port > 8080</port > <username > proxyuser</username > <password > somepassword</password > <nonProxyHosts > *.google.com|ibiblio.org</nonProxyHosts > </proxy > </proxies >
7、mirrors 配置镜像仓库。
1 2 3 4 5 6 7 8 9 10 11 12 13 14 15 <mirrors > <mirror > <id > alimaven</id > <name > aliyun maven</name > <url > https://maven.aliyun.com/repository/central</url > <mirrorOf > central</mirrorOf > </mirror > <mirror > <id > alimaven_public</id > <name > aliyun maven public</name > <url > http://maven.aliyun.com/nexus/content/groups/public/</url > <mirrorOf > *</mirrorOf > </mirror > </mirrors >
当本地仓库没有需要的依赖时,根据<mirrorOf>匹配远程仓库请求,去对应的镜像仓库地址拉取依赖。
下面是一些常用的语法示例:
<mirrorOf>*<mirrorOf>:匹配所有远程仓库。<mirrorOf>external:*<mirrorOf>:匹配所有不在本机上的远程仓库。<mirrorOf>repo1,repo2<mirrorOf>:匹配仓库repo1和repo2,使用逗号分隔多个远程仓库。<mirrorOf>*,!repo1<mirrorOf>:匹配所有远程仓库,repo1除外,使用感叹号将仓库从匹配中排除。
注意 :
此外,maven读取mirror配置是从上往下读取的,因此谨慎配置<mirrorOf>*<mirrorOf>,因为如果第一个镜像仓库配置了如此标志,那么如果该仓库即使不存在对应依赖也不会向下游查询。
8、profiles 根据环境参数来调整构建配置的列表。可以将settings.xml下的profile理解为pom.xml种profile的阉割版。
注意:
激活profile有三种方式
通过命令行编译构建时激活,最常用的方式。
通过activeProfiles直接激活,详细往下看。
通过activation激活,详细往下看。
通过命令行激活
通常在pom.xml中定义不同环境的profile,在编译构建不同的包时,执行下面的命令即可激活对应的profile进行编译构建。
以开发环境为例:
1
2
# 命令格式:mvn package -P [profile的ID] mvn package -P dev
repositories 定义了一组远程仓库的列表,当该属性对应的profile被激活时,会使用该远程仓库。
1 2 3 4 5 6 7 8 9 10 11 12 13 14 15 16 17 18 19 20 21 22 23 24 25 26 27 28 29 <repositories > <repository > <id > codehausSnapshots</id > <name > Codehaus Snapshots</name > <releases > <enabled > false</enabled > <updatePolicy > always</updatePolicy > <checksumPolicy > warn</checksumPolicy > </releases > <snapshots > <enabled /> <updatePolicy /> <checksumPolicy /> </snapshots > <url > http://snapshots.maven.codehaus.org/maven2</url > <layout > default</layout > </repository > </repositories >
properties 定义一组拓展属性,当对应的profile被激活时该属性才生效。mvn help:system可以获取System Properties和Environment Variables,根据下面注释进行使用即可。
1 2 3 4 5 6 7 8 9 10 11 <properties > <user.install > ${user.home}/our-project</user.install > </properties >
id 全局唯一标识,如果一个settings.xml中的profile被激活,它的值会覆盖任何其它定义在pom.xml中带有相同id的profile。
pluginRepositories 同repositories差不多,不过该标签定义的是插件的远程仓库。
activation 触发激活该profile的条件。注意在Maven 3.2.2之前,当满足一项指定条件时就会激活。从Maven 3.2.2开始,需要满足所有指定条件时才会激活。可以移步官方文档 查阅。
Before Maven 3.2.2 activation occurs when one or more of the specified criteria have been met. When the first positive result is encountered, processing stops and the profile is marked as active. Since Maven 3.2.2 activation occurs when all of the specified criteria have been met.
1 2 3 4 5 6 7 8 9 10 11 12 13 14 15 16 17 18 19 20 21 22 23 24 25 26 27 28 29 30 31 32 <activation > <activeByDefault > false</activeByDefault > <jdk > 1.5</jdk > <os > <name > Windows XP</name > <family > Windows</family > <arch > x86</arch > <version > 5.1.2600</version > </os > <property > <name > mavenVersion</name > <value > 2.0.3</value > </property > <file > <exists > ${basedir}/file2.properties</exists > <missing > ${basedir}/file1.properties</missing > </file > </activation >
9、activeProfiles 指定激活的profile,不管profile的activation配置如何,都会激活对应的profile。
1 2 3 4 5 <activeProfiles > <activeProfile > test</activeProfile > <activeProfile > dev</activeProfile > </activeProfiles >
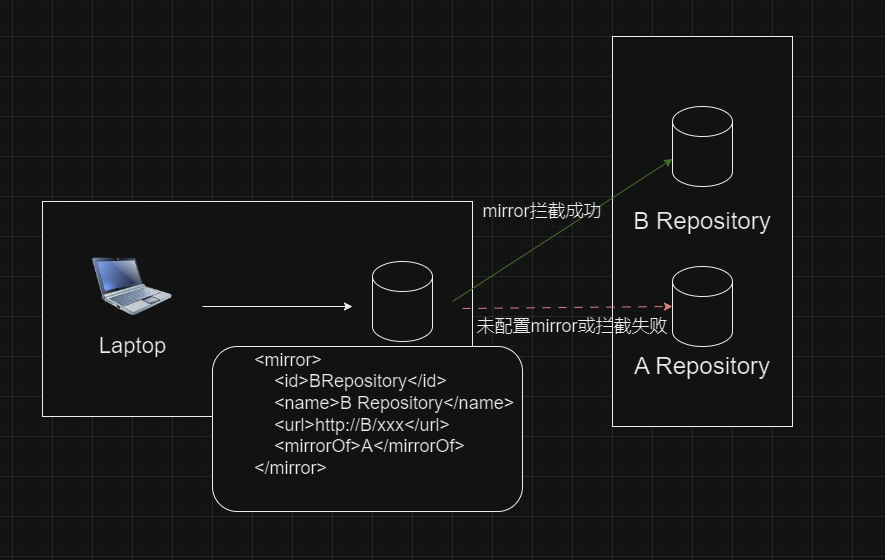
10、Settings.xml配置文件中mirrors和profile中repositories的关系 两个标签都定义了一个远程仓库的位置,如果一个依赖同时存在于这2个仓库,会先加载哪个依赖?
mirrors相当于拦截器,maven加载依赖时,如果mirror的mirrorOf配置的值与对应的repository的id相同,那么mirror的仓库地址替换掉repository的仓库地址。
五、pom.xml配置详解 settings.xml定义的是全局或用户的配置,pom.xml定义的是一个项目的依赖配置。
1 2 3 4 5 6 7 8 9 10 11 12 13 14 15 16 17 18 19 20 21 22 <project xmlns = "http://maven.apache.org/POM/4.0.0" xmlns:xsi = "http://www.w3.org/2001/XMLSchema-instance" xsi:schemaLocation = "http://maven.apache.org/POM/4.0.0 http://maven.apache.org/xsd/maven-4.0.0.xsd" > <modelVersion > 4.0.0</modelVersion > <groupId > com.companyname.project-group</groupId > <artifactId > projectid</artifactId > <version > 1.0.2</version > <packaging > jar</packaging > <name > blog project</name > <url > blog.tsukasa.moe</url > </project >
1、dependencies 定义了项目中所需要的相关依赖。
1 2 3 4 5 6 7 8 9 10 11 12 13 14 15 16 17 18 19 20 21 22 23 24 25 26 <dependencies > <dependency > <groupId > org.apache.maven</groupId > <artifactId > maven-artifact</artifactId > <version > 3.8.1</version > <exclusions > <exclusion > <artifactId > spring-core</artifactId > <groupId > org.springframework</groupId > </exclusion > </exclusions > <optional > true</optional > <scope > test</scope > </dependency > </dependencies >
2、dependencyManagement 一个服务中存在多个module时,每个子module可能都引用了相同的jar包,此时可以通过maven继承,父级pom.xml统一管理依赖版本。需要使用到<dependencyManagement>标签。
示例:
父级pom.xml
1 2 3 4 5 6 7 8 9 10 <dependencyManagement > <dependencies > <dependency > <groupId > org.aspectj</groupId > <artifactId > aspectjweaver</artifactId > <version > 1.0.0</version > </dependency > </dependencies > </dependencyManagement >
子module的pom.xml
1 2 3 4 5 6 7 8 9 10 11 12 13 14 15 <parent > <groupId > org.springframework.boot</groupId > <artifactId > spring-boot-starter-parent</artifactId > <version > 1.5.10.RELEASE</version > <relativePath /> </parent > <dependencies > <dependency > <groupId > org.aspectj</groupId > <artifactId > aspectjweaver</artifactId > </dependency > </dependencies >
3、properties properties主要用来定义常量,常见的有依赖版本、JDK版本、字节编码等,通过${value}来使用。
1 2 3 4 5 6 7 8 9 10 11 12 13 14 15 16 17 18 19 20 21 22 23 24 25 26 27 28 <properties > <java.version > 1.8</java.version > <project.build.sourceEncoding > UTF-8</project.build.sourceEncoding > <project.reporting.outputEncoding > UTF-8</project.reporting.outputEncoding > <spring-cloud.version > Finchley.RELEASE</spring-cloud.version > <slf4j.version > 1.7.12</slf4j.version > </properties > <dependencies > <dependency > <groupId > org.springframework.cloud</groupId > <artifactId > spring-cloud-dependencies</artifactId > <version > ${spring-cloud.version}</version > <type > pom</type > <scope > import</scope > </dependency > <dependency > <groupId > org.slf4j</groupId > <artifactId > slf4j-api</artifactId > <version > ${slf4j.version}</version > </dependency > <dependencies >
此外,Maven还通过约定大于配置的方式定义了一些常用的属性:
属性
定义
${basedir}存放pom.xml和所有的子目录
${basedir}/src/main/java项目的java源代码
${basedir}/src/main/resources项目的资源,比如说property文件,springmvc.xml
${basedir}/src/main/webapp/WEB-INFweb应用文件目录,web项目的信息,比如web.xml
${basedir}/target打包输出目录
${project.version}项目版本
${project.groupId}项目groupId
4、resources <build>下面的<resources>标签用来标识项目在编译运行时需要额外编译的文件。例如手工引入jar包、不同运行环境对应不同的profile等等。
<testResources>用法与<resources>类似。
1 2 3 4 5 6 7 8 9 10 11 12 13 14 15 16 17 18 19 20 21 22 23 24 25 26 27 28 29 30 31 32 33 34 35 36 37 <build > <resources > <resource > <directory > src/main/resources</directory > <filtering > true</filtering > <includes > <include > **/*.fxml</include > </includes > <excludes > <exclude > **/*.yaml</exclude > </excludes > </resource > <resource > <directory > src/main/profiles/product</directory > <filtering > true</filtering > <includes > <include > **/*.fxml</include > </includes > </resource > <resource > <directory > lib</directory > <targetPath > BOOT-INF/lib/</targetPath > <includes > <include > **/*.jar</include > </includes > </resource > </resources > </build >
5、profile 通常地,setting.xml用来标识不同的远程仓库,而pom中的profile一般用来标识当前profile的配置属于哪个环境,当然也可以用来指定远程仓库。
在编译打包时,通过mvn package -P prod命令来激活不同环境。
1 2 3 4 5 6 7 8 9 10 11 12 13 14 15 16 17 18 19 20 21 22 23 24 25 26 27 28 29 30 31 32 <profiles > <profile > <id > dev</id > <activation > <activeByDefault > true</activeByDefault > </activation > <properties > <project.active > dev</project.active > </properties > </profile > <profile > <id > test</id > <properties > <project.active > test</project.active > </properties > </profile > </profiles > <resources > <resource > <directory > src/main/${project.active}</directory > <filtering > true</filtering > <includes > <include > **/*.fxml</include > </includes > </resource > </resources >
在Intellij IDEA的Maven窗口中,profile作为一个个的可选项存在。
6、modules 项目中存在多个module时,如果需要单独打包需要在每一个module都执行maven命令,通过父级pom.xml添加的<modules>标签可以将自服务进行聚合,只需要打包该服务,也会将子module同时打包。
1 2 3 4 5 6 7 <modules > <module > spring-sub-module</module > <module > ../utils</module > </modules >
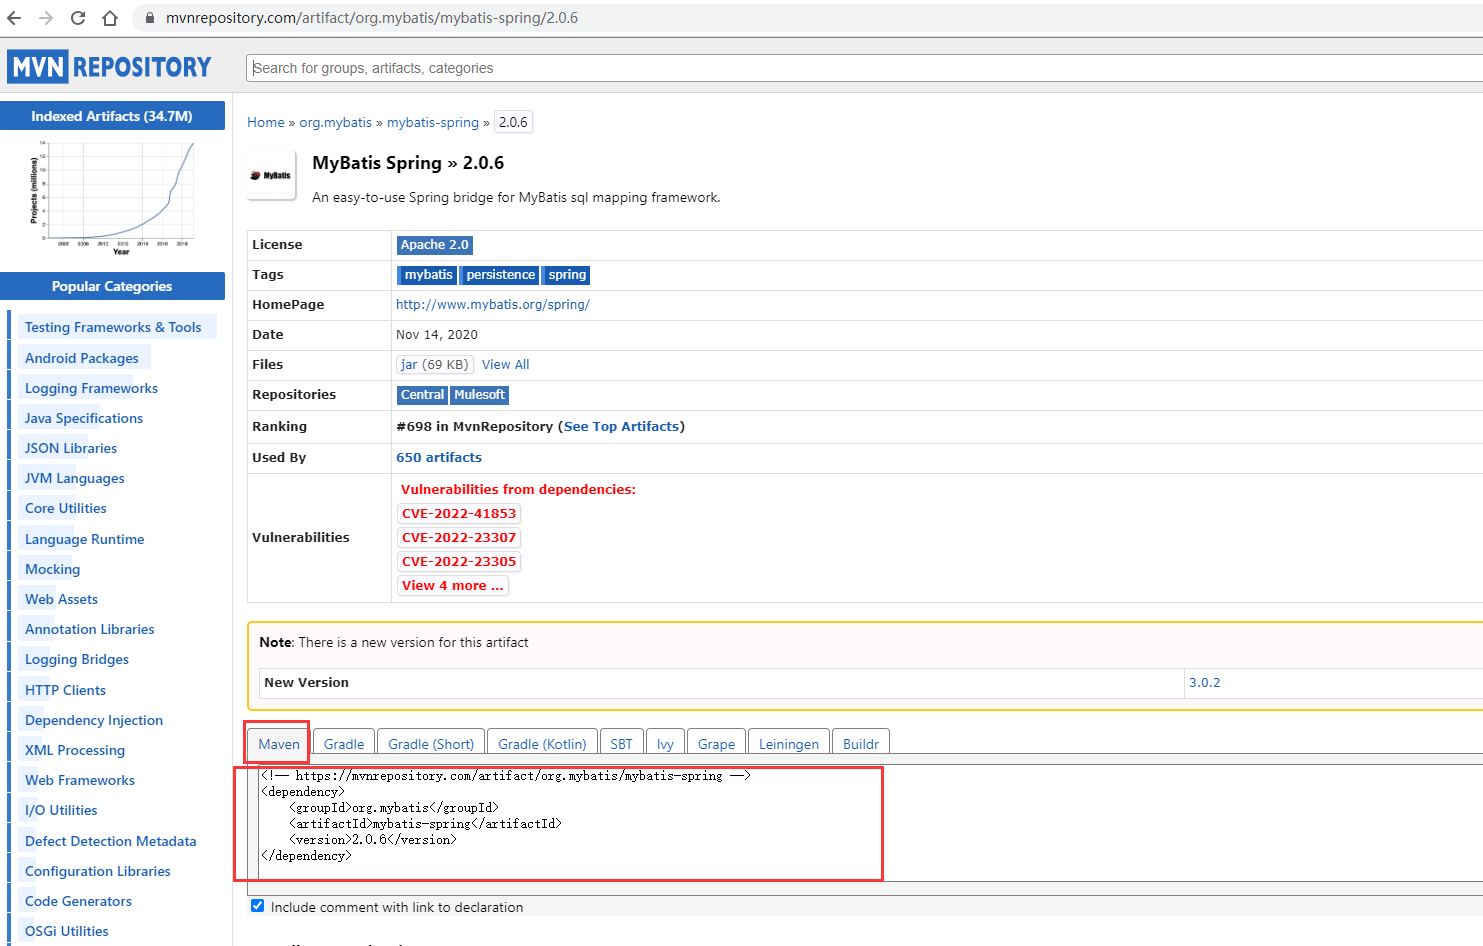
7、查找并添加依赖 配置好Maven后,想要添加什么依赖,可以到仓库索引 搜索,然后选择对应的坐标,复制到pom.xml文件<dependencies>中即可。
8、依赖范围管理 Maven项目构建生命周期包括clean清理项目,default构建项目,site生成项目文档和站点。重点关注default生命周期的各个阶段:
阶段
中文名称
描述
validate
校验
验证项目是否正确,所有必需信息是否可用。
initialize
初始化
初始化构建状态,例如设置属性或创建目录。
generate-sources
生成源代码
生成项目的源代码。
process-sources
处理源代码
处理项目的源代码,例如进行过滤等操作。
generate-resources
生成资源文件
生成项目的资源文件。
process-resources
处理资源文件
复制并处理资源文件,为打包做准备。
compile 编译
编译项目的源代码。
process-classes
处理类文件(字节码)
对编译后的字节码进行处理。
generate-test-sources
生成测试源代码
生成项目的测试源代码。
process-test-sources
处理测试源代码
处理项目的测试源代码,例如进行过滤等操作。
generate-test-resources
生成测试资源文件
生成项目的测试资源文件。
process-test-resources
处理测试资源文件
复制并处理测试资源文件,为测试做准备。
test-compile 编译测试源代码
编译项目的测试源代码。
process-test-classes
处理测试类文件(字节码)
对测试编译后的字节码进行处理。
test 测试
使用合适的测试框架运行测试(一般我们在idea种开发项目时,可以选择屏蔽掉test步骤)。
prepare-package
准备打包
进行必要的操作,以便进行打包。
package 打包
将编译后的代码打包成可分发的格式,例如 JAR、WAR。
pre-integration-test
集成测试前
在集成测试之前进行的操作。
integration-test
集成测试
处理和部署项目,以便进行集成测试。
post-integration-test
集成测试后
在集成测试之后进行的操作。
verify
验证
检查包是否有效,符合质量标准。
install 安装
将包安装到本地仓库,以便其他项目依赖。
deploy
部署
将最终的包复制到远程仓库,共享给其他开发人员和项目。
<dependency>标签中有一个子标签<scope>,默认值为compile,记录了依赖的jar包在哪些环境有效
Scope
编译环境
测试环境
运行环境
例子
描述
compile
Y
Y
Y
spring-core
依赖对所有的classpath都有效
provided
Y
Y
-
servlet-api
执行打包mvn package时会移除,运行时由应用服务器提供
system
Y
Y
-
本地的,Maven仓库之外的类库文件
类似provided,但依赖项不会从maven仓库中查找,通过<systemPath>标签获取
runtime
-
Y
Y
jdbc驱动包
编译的时候不需要,只在运行和测试的时候需要用到
test
-
Y
-
Junit/Mockito
只在测试编译和测试运行阶段可用
还有一个特殊的取值:import,仅在父级pom.xml的<dependencyManagement>的标签中可用,不做展开。
scope为system示例:
1 2 3 4 5 6 7 8 <dependency > <groupId > org.open</groupId > <artifactId > open-core</artifactId > <version > 1.5</version > <scope > system</scope > <systemPath > ${basedir}/WebContent/WEB-INF/lib/open-core.jar</systemPath > </dependency >
关于Dependency Scope的官方描述,请查阅:https://maven.apache.org/guides/introduction/introduction-to-dependency-mechanism.html
总结
通过maven引入的jar包,里面的类都是已经编译好的字节码,与scope参数没有什么联系。
compile、runtime和provided的区别,需要在执行打包mvn package命令,并且打包格式时war时才能看出来。
通过compile和provided引入的jar包,里面的类,在项目中直接import进来就可以使用了,编译也没有问题;
9、解决依赖冲突 依赖传递遵循三个原则:
最短路径优先:项目中存在两级以上的不同依赖,引用同一个依赖时,层级越浅,优先级越高。举例:项目A -> B -> C1,A -> D -> E -> C2,其中C1和C2是同一个依赖的不同版本,此时A项目以C1的版本为准。
声明优先:对于两级以上的同级依赖,先声明的依赖会覆盖后声明的依赖包。举例:项目A -> B -> C1,A -> D -> C2,以C1版本为准。
特殊优先:同级依赖中,后加载覆盖先加载原则。举例:项目A->C1,再次配置A->C2,那么以C1版本为准。
Intellij IDEA解决依赖冲突思路:
通过Maven Helper插件的Dependency Analyzer对pom文件进行依赖分析,找到冲突或重复的jar包,用<exclusions>标签排除不需要的版本,要注意是否存在兼容性问题。此外也可以通过命令行mvn dependency:tree查看项目的依赖树,观察实际加载的版本。
编译打包后打开查看实际打的jar包版本,进行核对
依赖分析相关的maven命令
mvn dependency:list:查看项目已解析的依赖。mvn dependency:tree 查看项目的依赖树。mvn dependency:analyze:分析项目的依赖信息,有2种,根据需要选择主动声明,或者移除不需要的依赖。
Used undeclared dependencies,项目中已使用但未声明的依赖。
Unused declared dependencies,项目中未使用但已声明的依赖。
六、参考资料 Maven进阶学习指南 | 京东云技术团队 实际上手体验maven面对冲突Jar包的加载规则 | 京东云技术团队
声明:本站所有文章均为原创或翻译,遵循署名 - 非商业性使用 - 禁止演绎 4.0 国际许可协议 ,如需转载请确保您对该协议有足够了解,并附上作者名 (Tsukasa) 及原文地址


![]()


