前言
这是一篇针对新手使用Eclipse如何搭建SSM项目的教程,大佬可以右上叉了,文章主要内容包括:
- SSM框架原理备忘图示
- Eclipse集成Maven工具
- 进行框架文件配置
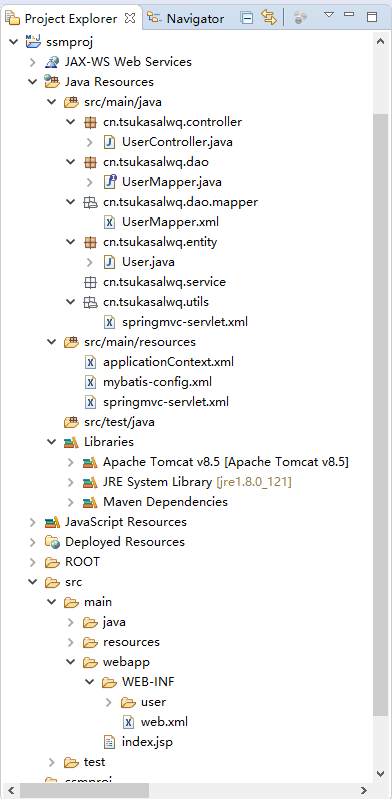
项目配置完成后的图片:

SSM框架工作原理
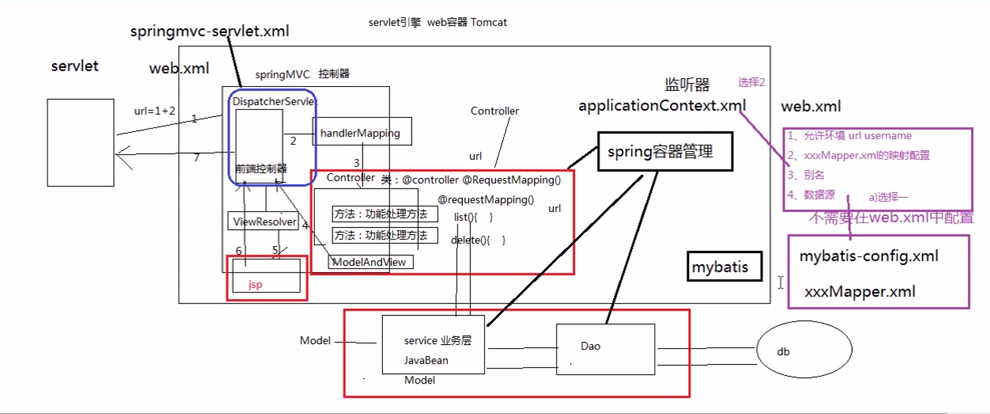
首先确保阅读过SSM各部分是如何工作的,又有那些配置文件,这里直接祭出一张Spring+SpringMVC+Mybatis框架工作原理:

Maven项目管理工具
Maven一个项目构建,依赖管理,项目信息管理工具,类似的还有Gradle,Ant。Maven主要有以下三个作用:
那么你可能会问Maven是如何工作的呢?项目中所用到jar包,在没有用管理工具之前,我们先从网上下载回来存放到项目的lib目录中,然后添加相应的依赖,项目才能够使用其中的API完成我们的编码。而Maven则是一个只需要你在pom.xml配置文件中添加相应配置,就会帮你完成上述工作的工具。Maven又是去哪里获取依赖的呢?请看下图:

首先Maven会从本地仓库寻找项目用到的jar包,假设我们配置私服,则先是到私服上面找,如果私服上也没有我们想要的jar包,最后才去中央仓库下载我们的依赖,如果中央服务器还是没有呢,好吧,大概是未发布上去的依赖jar包,这时你才需要使用原始的方法导入。
下载并安装Maven:下载Maven并解压,配置环境变量MAVEN_HOME为D:\Framework\Maven\apache-maven-3.5.0,并添加到PATH中%MAVEN_HOME%;
测试配置是否成功:打开cmd,运行输入mvn -v查看版本
本地仓库配置:新建D:\Workplace\Maven\maven-repository文件夹做本地仓库,用于存放下载的jar包。打开目录解压目录如D:\Framework\Maven\apache-maven-3.5.0\conf下的settings.xml编辑,setting标签内添加下面代码,然后复制settings.xml到仓库文件夹中,Eclipse会通过指定的settings.xml找到我们的本地仓库。
1
| <localRepository>D:\Workplace\Maven\maven-repository</localRepository>
|
在settings.xml的mirrors配置了私服:
1
2
3
4
5
6
7
8
| <mirrors>
<mirror>
<id>nexus-aliyun</id>
<mirrorOf>*</mirrorOf>
<name>Nexus aliyun</name>
<url>http://maven.aliyun.com/nexus/content/public</url>
</mirror>
</mirrors>
|
在profiles标签下配置jdk版本
1
2
3
4
5
6
7
8
9
10
11
12
13
14
15
| <profiles>
<profile>
<id>jdk-1.8</id>
<activation>
<jdk>1.8</jdk>
</activation>
<properties>
<maven.compiler.source>1.8</maven.compiler.source>
<maven.compiler.target>1.8</maven.compiler.target>
<maven.compiler.compilerVersion>1.8</maven.compiler.compilerVersion>
</properties>
</profile>
</profiles>
|
Eclipse进行关联:
Windows => Preferences => Maven => Installations中添加Maven安装目录并打勾Maven => User Settings下通过Global Settings或者User Settings设置本地仓库Local Repository,至此Maven配置结束
下面讲解如何使用Maven呢?
首先在中搜索你需要的jar包名称,添加需要jar包的groupId,artifactId,version三个属性,保存pom.xml文件后Maven就会自动下载并配置好,我们就可以愉快的使用API了。
1
2
3
4
5
6
| <dependency>
<groupId>junit</groupId> 项目名
<artifactId>junit</artifactId> 项目模块
<version>3.8.1</version> 项目版本
<scope>test</scope>
</dependency>
|
Eclipse新建一个SSM项目
打开Eclipse,新建maven project,勾选Create a simple project(skip archetype selection),web项目设置Packaging为war包,Maven项目创建成功
在新建项目右键,Properties => Project Facets中设置Dynamic Web Module版本为3.0和Java版本并勾选,点击新出现的Further configuration available填写Content directory为src/main/webapp,并勾选Generate web.xml deployment descriptor,Apply,Maven项目创建成功。
- 添加SSM框架用到的依赖配置,如下所示:
1
2
3
4
5
6
7
8
9
10
11
12
13
14
15
16
17
18
19
20
21
22
23
24
25
26
27
28
29
30
31
32
33
34
35
36
37
38
39
40
41
42
43
44
45
46
47
48
49
50
51
52
53
54
55
56
57
58
59
60
61
62
63
64
65
66
67
68
69
70
71
72
73
74
75
76
77
78
79
80
81
82
83
84
85
86
87
88
89
90
91
92
93
94
95
96
97
98
99
100
101
102
103
104
105
106
107
108
109
110
111
112
113
114
115
116
117
118
119
120
121
122
123
124
125
126
127
128
129
130
131
132
133
134
135
136
137
138
139
140
141
142
143
144
145
146
147
148
149
150
151
152
153
154
155
156
157
158
159
160
161
162
163
164
165
166
167
168
169
170
171
172
173
174
175
176
177
178
179
180
181
182
183
184
185
186
187
188
189
190
191
192
193
194
195
196
197
198
199
200
201
202
203
204
205
206
207
208
209
| <project xmlns="http://maven.apache.org/POM/4.0.0" xmlns:xsi="http://www.w3.org/2001/XMLSchema-instance"
xsi:schemaLocation="http://maven.apache.org/POM/4.0.0 http://maven.apache.org/maven-v4_0_0.xsd">
<modelVersion>4.0.0</modelVersion>
<groupId>cn.tsukasalwq</groupId>
<artifactId>ssmproj</artifactId>
<packaging>war</packaging>
<version>0.0.1-SNAPSHOT</version>
<name>ssmproj Maven Webapp</name>
<url>http://maven.apache.org</url>
<properties>
<spring.version>4.0.2.RELEASE</spring.version>
<mybatis.version>3.2.6</mybatis.version>
<slf4j.version>1.7.7</slf4j.version>
<log4j.version>1.2.17</log4j.version>
</properties>
<dependencies>
<dependency>
<groupId>junit</groupId>
<artifactId>junit</artifactId>
<version>3.8.1</version>
<scope>test</scope>
</dependency>
<dependency>
<groupId>org.springframework</groupId>
<artifactId>spring-core</artifactId>
<version>${spring.version}</version>
</dependency>
<dependency>
<groupId>org.springframework</groupId>
<artifactId>spring-web</artifactId>
<version>${spring.version}</version>
</dependency>
<dependency>
<groupId>org.springframework</groupId>
<artifactId>spring-oxm</artifactId>
<version>${spring.version}</version>
</dependency>
<dependency>
<groupId>org.springframework</groupId>
<artifactId>spring-tx</artifactId>
<version>${spring.version}</version>
</dependency>
<dependency>
<groupId>org.springframework</groupId>
<artifactId>spring-jdbc</artifactId>
<version>${spring.version}</version>
</dependency>
<dependency>
<groupId>org.springframework</groupId>
<artifactId>spring-webmvc</artifactId>
<version>${spring.version}</version>
</dependency>
<dependency>
<groupId>org.springframework</groupId>
<artifactId>spring-aop</artifactId>
<version>${spring.version}</version>
</dependency>
<dependency>
<groupId>org.springframework</groupId>
<artifactId>spring-context-support</artifactId>
<version>${spring.version}</version>
</dependency>
<dependency>
<groupId>org.springframework</groupId>
<artifactId>spring-test</artifactId>
<version>${spring.version}</version>
</dependency>
<dependency>
<groupId>org.mybatis</groupId>
<artifactId>mybatis</artifactId>
<version>${mybatis.version}</version>
</dependency>
<dependency>
<groupId>org.mybatis</groupId>
<artifactId>mybatis-spring</artifactId>
<version>1.2.2</version>
</dependency>
<dependency>
<groupId>javax.servlet.jsp</groupId>
<artifactId>jsp-api</artifactId>
<version>2.2</version>
</dependency>
<dependency>
<groupId>javax.servlet</groupId>
<artifactId>javax.servlet-api</artifactId>
<version>3.0.1</version>
<scope>provided</scope>
</dependency>
<dependency>
<groupId>mysql</groupId>
<artifactId>mysql-connector-java</artifactId>
<version>5.1.30</version>
</dependency>
<dependency>
<groupId>commons-dbcp</groupId>
<artifactId>commons-dbcp</artifactId>
<version>1.2.2</version>
</dependency>
<dependency>
<groupId>jstl</groupId>
<artifactId>jstl</artifactId>
<version>1.2</version>
</dependency>
<dependency>
<groupId>log4j</groupId>
<artifactId>log4j</artifactId>
<version>${log4j.version}</version>
</dependency>
<dependency>
<groupId>com.alibaba</groupId>
<artifactId>fastjson</artifactId>
<version>1.1.41</version>
</dependency>
<dependency>
<groupId>org.slf4j</groupId>
<artifactId>slf4j-api</artifactId>
<version>${slf4j.version}</version>
</dependency>
<dependency>
<groupId>org.slf4j</groupId>
<artifactId>slf4j-log4j12</artifactId>
<version>${slf4j.version}</version>
</dependency>
<dependency>
<groupId>org.codehaus.jackson</groupId>
<artifactId>jackson-mapper-asl</artifactId>
<version>1.9.13</version>
</dependency>
<dependency>
<groupId>commons-fileupload</groupId>
<artifactId>commons-fileupload</artifactId>
<version>1.3.1</version>
</dependency>
<dependency>
<groupId>commons-io</groupId>
<artifactId>commons-io</artifactId>
<version>2.4</version>
</dependency>
<dependency>
<groupId>commons-codec</groupId>
<artifactId>commons-codec</artifactId>
<version>1.9</version>
</dependency>
<dependency>
<groupId>com.github.pagehelper</groupId>
<artifactId>pagehelper</artifactId>
<version>5.0.3</version>
</dependency>
<dependency>
<groupId>org.mybatis.generator</groupId>
<artifactId>mybatis-generator-core</artifactId>
<version>1.3.5</version>
</dependency>
<dependency>
<groupId>c3p0</groupId>
<artifactId>c3p0</artifactId>
<version>0.9.1</version>
</dependency>
</dependencies>
<build>
<finalName>ssmproj</finalName>
</build>
</project>
|
- 最后创建package:
cn.tsukasalwq.entity:实体类,表结构的映射
cn.tsukasalwq.dao:数据持久层,管理数据库
cn.tsukasalwq.service:业务模块的逻辑应用设计
cn.tsukasalwq.controller:业务模块流程的控制
cn.tsukasalwq.utils:工具类集合
一个表 ==> 实体类Entity ==> 数据操作接口 ==> xml ==> 业务接口 ==> 业务实现类
配置Mybatis
配置dtd
解压mybatis的jar包,把org/apache/ibatis/builder/xml的dtd文件复制到Tools文件夹,Windows-->Preferences-->XML-->XML Catalog配置
mybatis-3-config.dtd对应key:-//mybatis.org//DTD Config 3.0//EN
mybatis-3-mapper.dtd对应key:-//mybatis.org//DTD Mapper 3.0//EN
mybatis-config.xml是mybatis的全局配置文件,用于配置数据源,事务。
步骤:new other => 输入xml选xml file => 一直next,配置dtd,生成mybatis-config.xml文件:
1
2
3
4
5
| <?xml version="1.0" encoding="UTF-8"?>
<!DOCTYPE configuration PUBLIC "-//mybatis.org//DTD Config 3.0//EN" "mybatis-3-config.dtd" >
<configuration>
</configuration>
|
映射文件XXXMapper.xml初始化如下:
1
2
3
4
5
| <?xml version="1.0" encoding="UTF-8"?>
<!DOCTYPE mapper PUBLIC "-//mybatis.org//DTD Mapper 3.0//EN" "mybatis-3-mapper.dtd" >
<mapper>
</mapper>
|
Spring配置:applicationContext.xml
1
2
3
4
5
6
7
8
9
10
11
12
13
14
15
16
17
18
19
20
21
22
23
24
25
| <?xml version="1.0" encoding="UTF-8"?>
<beans
xmlns="http://www.springframework.org/schema/beans"
xmlns:xsi="http://www.w3.org/2001/XMLSchema-instance"
xmlns:aop="http://www.springframework.org/schema/aop"
xmlns:context="http://www.springframework.org/schema/context"
xmlns:tx="http://www.springframework.org/schema/tx"
xmlns:cache="http://www.springframework.org/schema/cache"
xmlns:p="http://www.springframework.org/schema/p"
xmlns:mvc="http://www.springframework.org/schema/mvc"
xsi:schemaLocation="
http://www.springframework.org/schema/beans
http://www.springframework.org/schema/beans/spring-beans-4.3.xsd
http://www.springframework.org/schema/mvc
http://www.springframework.org/schema/mvc/spring-mvc-4.3.xsd
http://www.springframework.org/schema/aop
http://www.springframework.org/schema/aop/spring-aop-4.3.xsd
http://www.springframework.org/schema/context
http://www.springframework.org/schema/context/spring-context-4.3.xsd
http://www.springframework.org/schema/tx
http://www.springframework.org/schema/tx/spring-tx-4.3.xsd
http://www.springframework.org/schema/cache
http://www.springframework.org/schema/cache/spring-cache-4.3.xsd">
</beans>
|
小技巧:对常用代码段可以配置模板,Preferences => XM => XML Files=> Editor =>Templates中添加,在.xml文件Alt+/即可直接导入模板。
spring-servlet.xml:
1
2
3
4
5
6
7
8
9
10
11
12
13
14
15
16
17
18
19
20
21
22
23
24
25
26
27
28
29
30
31
32
33
34
35
36
| <?xml version="1.0" encoding="UTF-8"?>
<beans xmlns="http://www.springframework.org/schema/beans"
xmlns:xsi="http://www.w3.org/2001/XMLSchema-instance" xmlns:aop="http://www.springframework.org/schema/aop"
xmlns:context="http://www.springframework.org/schema/context" xmlns:tx="http://www.springframework.org/schema/tx"
xmlns:cache="http://www.springframework.org/schema/cache" xmlns:p="http://www.springframework.org/schema/p"
xmlns:mvc="http://www.springframework.org/schema/mvc"
xsi:schemaLocation="
http://www.springframework.org/schema/beans
http://www.springframework.org/schema/beans/spring-beans-4.3.xsd
http://www.springframework.org/schema/mvc
http://www.springframework.org/schema/mvc/spring-mvc-4.3.xsd
http://www.springframework.org/schema/aop
http://www.springframework.org/schema/aop/spring-aop-4.3.xsd
http://www.springframework.org/schema/context
http://www.springframework.org/schema/context/spring-context-4.3.xsd
http://www.springframework.org/schema/tx
http://www.springframework.org/schema/tx/spring-tx-4.3.xsd">
<context:component-scan
base-package="cn.tsukasalwq.controller,cn.tsukasalwq.service" />
<mvc:annotation-driven></mvc:annotation-driven>
<bean id="multipartResolver"
class="org.springframework.web.multipart.commons.CommonsMultipartResolver">
<property name="maxUploadSize" value="104857600"></property>
<property name="defaultEncoding" value="utf-8"></property>
</bean>
<bean
class="org.springframework.web.servlet.view.InternalResourceViewResolver">
<property name="prefix" value="/WEB-INF/"></property>
<property name="suffix" value=".jsp"></property>
</bean>
</beans>
|
在Spring中整合SpringMVC:
在项目上右键,Resource中设置xml编码为UTF-8
加载Spring的配置文件applicationContext.xml,监听器方式,虽然applicationContext.xml放在webapp/WEB-INF下会自动加载,但是不方便集中管理,存在多个Spring配置文件时可以用*组合加载进来
SpringMVC配置文件,它是通过一个DispatchServlet的Servlet去配置的
web.xml
1
2
3
4
5
6
7
8
9
10
11
12
13
14
15
16
17
18
19
20
21
22
23
24
25
26
27
28
29
30
31
32
33
34
35
36
37
38
39
40
41
42
43
44
45
46
47
48
49
50
51
52
53
54
55
| <?xml version="1.0" encoding="UTF-8"?>
<web-app xmlns:xsi="http://www.w3.org/2001/XMLSchema-instance"
xmlns="http://java.sun.com/xml/ns/javaee"
xsi:schemaLocation="http://java.sun.com/xml/ns/javaee http://java.sun.com/xml/ns/javaee/web-app_3_0.xsd"
id="schedule-console" version="3.0">
<display-name>ssmproj</display-name>
<filter>
<filter-name>characterEncodingFilter</filter-name>
<filter-class>org.springframework.web.filter.CharacterEncodingFilter</filter-class>
<async-supported>true</async-supported>
<init-param>
<param-name>encoding</param-name>
<param-value>UTF-8</param-value>
</init-param>
<init-param>
<param-name>forceEncoding</param-name>
<param-value>true</param-value>
</init-param>
</filter>
<filter-mapping>
<filter-name>characterEncodingFilter</filter-name>
<url-pattern>/*</url-pattern>
</filter-mapping>
<context-param>
<param-name>contextConfigLocation</param-name>
<param-value>classpath:applicationContext.xml</param-value>
</context-param>
<listener>
<listener-class>org.springframework.web.context.ContextLoaderListener</listener-class>
</listener>
<listener>
<listener-class>org.springframework.web.util.IntrospectorCleanupListener</listener-class>
</listener>
<servlet>
<servlet-name>DispatcherServlet</servlet-name>
<servlet-class>org.springframework.web.servlet.DispatcherServlet</servlet-class>
<init-param>
<param-name>contextConfigLocation</param-name>
<param-value>classpath:springmvc-servlet.xml</param-value>
</init-param>
<load-on-startup>1</load-on-startup>
</servlet>
<servlet-mapping>
<servlet-name>DispatcherServlet</servlet-name>
<url-pattern>/</url-pattern>
</servlet-mapping>
</web-app>
|
Servers添加相应版本tomcat => 右键 => Add and Remove

Project Explorer视图下的Server => server.xml更改根名称,以localhost:8080为根目录则更改为下面的path
1
| <Context docBase="ssmproj" path="/" reloadable="true" source="org.eclipse.jst.jee.server:ssmproj"/>
|
Navigator视图下,.settings文件夹文件org.eclipse.wst.common.project.facet.core.xml更改java,jst相关版本和添加相应fixed
1
2
3
4
5
6
7
8
9
10
| <?xml version="1.0" encoding="UTF-8"?>
<faceted-project>
<runtime name="Apache Tomcat v8.5"/>
<fixed facet="wst.jsdt.web"/>
<fixed facet="jst.web"/>
<fixed facet="java"/>
<installed facet="java" version="1.8"/>
<installed facet="jst.web" version="3.0"/>
<installed facet="wst.jsdt.web" version="1.0"/>
</faceted-project>
|
配置完成后,项目已经可以跑起来了,要想整合持久层框架则需要mybatis-config.xml文件整合进来。
声明:本站所有文章均为原创或翻译,遵循署名 - 非商业性使用 - 禁止演绎 4.0 国际许可协议,如需转载请确保您对该协议有足够了解,并附上作者名 (Tsukasa) 及原文地址


